
COLLECT DATA > SEND DATA > JOB ASSIGNMENT
In order to make a project Architedia needs various information about your home. We call this the property survey.
The survey is an opportunity to discover details and get new ideas. If well prepared, it won’t take long.
We will go along 3 steps: •client vision •pictures •floor plan. Let´s start.
vision | picture | floor·plan
This is the input from your side: dreams, intended use, needs, etc.
You can describe your wishes in this simple form: client form

vision | picture | floor·plan
the photos convey important information about the property.
A mobile phone ![]() will do it fine. It should have at least 8MP. Eventually check the settings to have the highest resolution.
will do it fine. It should have at least 8MP. Eventually check the settings to have the highest resolution.
disclosure some suggestions for good interior pictures
Save all the pictures in a folder and check them about the quality and if there is any area missing. Now organize them with a proper name. We need to know which rooms they correspond to.
This is our favourite syntax to name pictures: roomname-XXdetail.jpg, where “XX” is a progressive number and “detail” is for extra specification when needed. Here an example with 5 pictures of the kitchen : kitchen-01.jpg, kitchen-02.jpg, kitchen-03.jpg, kitchen-04.jpg, kitchen-05boiler.jpg
done The images collection is ready!
Finally, we need a plan of the current situation.
You might already have the drawing plan. Otherwise ask the state agent, the previous owner or the Land Registry.
Check the plan with the current situation and note any information there might missing.
Here some point that might be useful to add:
- Orientation ( the direction of the North). You can see it on a map (usually oriented to the north).
- Surroundings. This information may help define the best disposition of the rooms. For example: “side overlooking a street with noisy traffic“, “balcony overlooking a nice inner garden“, ..
- Room´s name. For example based on the current function : kitchen, bedroom 1, bedroom 2, …
- Specify the height of the rooms. Usually, they are all the same. You can add at the bottom a note: “all rooms height 260cm, unless otherwise specified“. And if a room has a different height write it inside the room ( for example: “H=240cm”).
- Any additional matter related to the current situation, for example: “here there was a chimney“, “the floor is 2cm higher than in the other rooms“, “sliding door hidden in cupboard“, ..
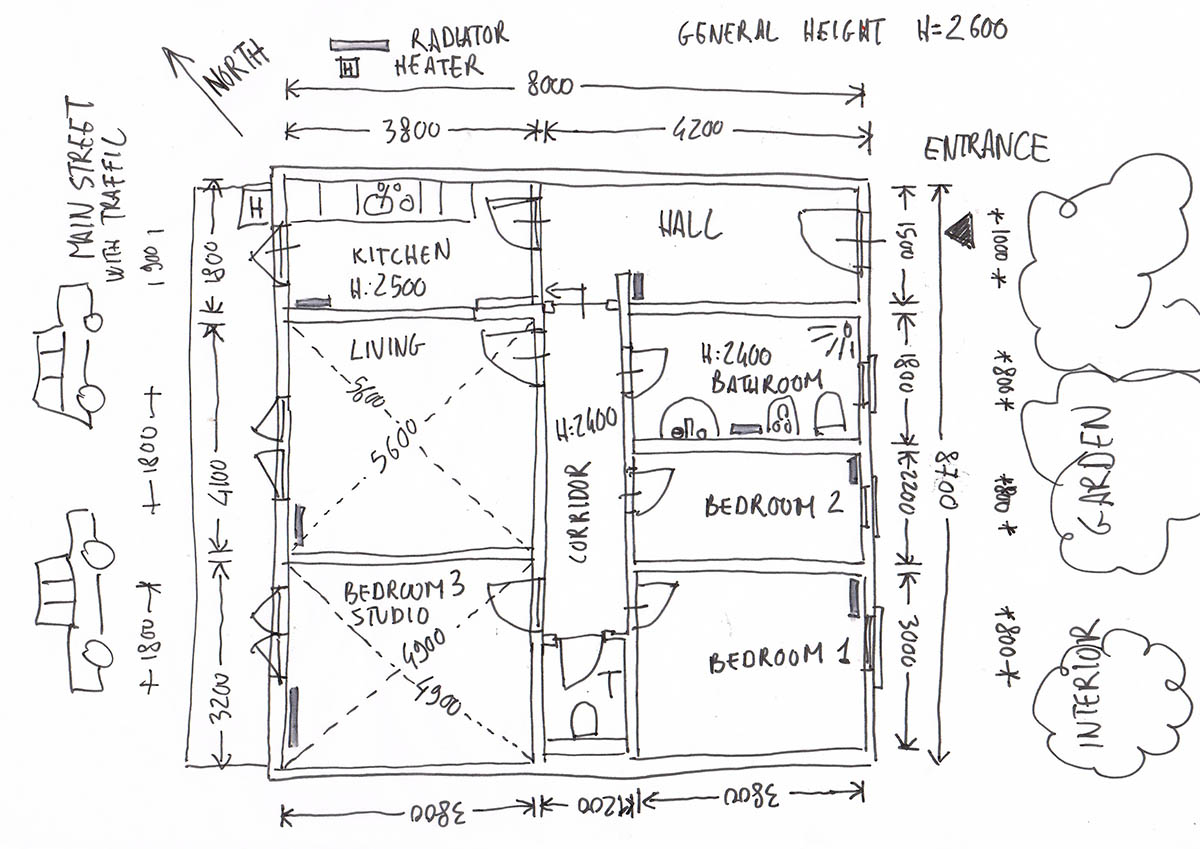
The floor plan is ready! Make a picture, or a digital copy if you have a scanner.
In case you cannot find any plan, here a simple and practical guide to make it yourself: floorplan guide
done Data completed !
Arrange the pictures and the floorplan in a folder so you can easily select it for sending.
